HOPE XV Electronic Badge: Difference between revisions
Add BOM for component designation refrence. Table collapsed by default. |
m Add a note about power cycling the badge after flashing |
||
| (14 intermediate revisions by 5 users not shown) | |||
| Line 1: | Line 1: | ||
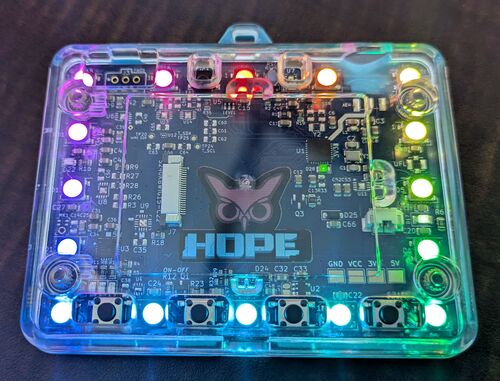
-- | [[File:HOPE_XV_electronic_badge_photo_front.jpg|thumb|500px|The HOPE XV Electronic Badge PCB (front)]]<br> | ||
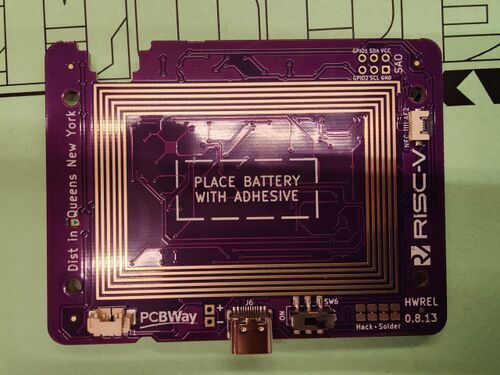
[[File:Hopexv-badge-back.jpg|thumb|500px|The HOPE XV Electronic Badge PCB (back)]]<br> | |||
= Firmware = | = Firmware = | ||
<Must-still-be-uploaded> | <Must-still-be-uploaded><br> | ||
hopebadge-0.8.14.bin | hopebadge-0.8.14.bin | ||
= Badge Clinic = | |||
Come by the Badge Clinic, and one of our specialized nurse practitioners will help you with all of your HOPE XV Electronic Badge needs.<br> | |||
Come by for:<br> | |||
* help with assembly | |||
* to find out more about features | |||
* to hack on the badge | |||
* to volunteer to help others | |||
= Description = | = Description = | ||
The HOPE XV badge was given to in-person HOPE attendees. Circuit boards are purple (attendee badge) and black (pro version with more components populated). Cases are pink, green, and black (pro version). | |||
<br>Two 'pro' versions (with additional components) could be purchased at the Badge Clinic for $100 (extra components) and $150 (extra components and accessories). | |||
<br> | <br> | ||
| Line 46: | Line 33: | ||
* Feature 3 | * Feature 3 | ||
* Feature etc | * Feature etc | ||
== The Buttons == | |||
The firmware on the attendee Badge is setup for: | |||
* button 1 - cycle thru light patterns | |||
* button 2, 3 - dim/brighten LEDs | |||
* button 4 - push to send an IR blast to other badges in Range, making their lights flash and motor vibrate | |||
== Open Hardware == | == Open Hardware == | ||
The HOPE XV Electronic Badge is totally [https://gitlab.com/tidklaas/hip-badge Open Hardware]!<br> | The HOPE XV Electronic Badge is totally [https://gitlab.com/tidklaas/hip-badge Open Hardware]!<br>Use the vibration branch to pickup the code that runs the small vibration motor. | ||
* The repository linked appears to be correct (REL_0.8.14), but does not specifically mention HOPE, so looking for confirmation. | * The repository linked appears to be correct (REL_0.8.14), but does not specifically mention HOPE, so looking for confirmation. | ||
It is also totally hackable. | It is also totally hackable. | ||
| Line 212: | Line 205: | ||
|} | |} | ||
== Badge | == User Manual == | ||
The User Manual has a lot of useful information -- you can see the PDF [https://wiki.hope.net/images/6/6b/HOPE_XV_Electronic_Badge_User_Manual.pdf here]:<br> | |||
[https://wiki.hope.net/images/6/6b/HOPE_XV_Electronic_Badge_User_Manual.pdf HOPE XV Electronic Badge User Manual]<br> | |||
[[File:UsersManualStandardPage1.jpg|500px|center]]<br> | |||
<br> | |||
Here is the User Manual for the Pro model of the [https://wiki.hope.net/images/5/56/HOPE_XV_Electronic_Badge_Pro_User_Manual.pdf HOPE XV electronic badge]:<br> | |||
[https://wiki.hope.net/images/5/56/HOPE_XV_Electronic_Badge_Pro_User_Manual.pdf HOPE XV Pro Model User Manual] | |||
[[File:UsersManualPage1.jpg|500px|center]]<br> | |||
<br> | |||
= MicroPython = | |||
[https://micropython.org/download/ESP32_GENERIC_C3/ MicroPython firmware] can be flashed on the badge to explore its features with an interactive Python console. When finished, you can [https://github.com/dhylands/rshell copy your code] to <code>/boot.py</code> to have it run each time it's powered on. | |||
== Installation == | |||
'''Note''': this will erase [https://gitlab.com/tidklaas/hip-badge the HOPE firmware], so please obtain a copy if you'd like to flash it back. | |||
Using the [https://docs.espressif.com/projects/esptool/en/latest/esp32/installation.html esptool.py flasher utility]: | |||
<nowiki>esptool.py erase_flash | |||
esptool.py write_flash 0x0 ~/Downloads/ESP32_GENERIC_C3-20240602-v1.23.0.bin</nowiki> | |||
''If no serial device is found, try holding down the <code>SW2</code> button while switching on the badge to put it in "safe mode".'' | |||
When finished, make note of the serial port auto-detected by esptool.py (ex. <code>/dev/ttyACM0</code>). You should now be able to get a Python console with: | |||
<nowiki>screen /dev/ttyACM0 | |||
>>> print('hello world') | |||
hello world</nowiki> | |||
''If you only see a blank screen, try pressing Enter and/or turning the badge off and back on again.'' | |||
* | == Snippets == | ||
Please see the [https://docs.micropython.org/en/latest/esp32/quickref.html Quick reference for the ESP32] for helpful snippets. | |||
=== WiFi === | |||
WiFi works (please see [https://docs.micropython.org/en/latest/esp32/quickref.html#wlan this guide]), with one caveat: maybe my badge is faulty, but I had to reduce the transmit power level slightly to connect to an access point: | |||
<nowiki>import network | |||
wlan = network.WLAN(network.STA_IF) | |||
wlan.active(True) | |||
wlan.config(txpower = 14) # HACK: see note above | |||
wlan.connect('my-ssid', 'my-key') | |||
wlan.isconnected() # wait until True | |||
wlan.ifconfig() | |||
</nowiki> | |||
=== LEDs === | |||
A NeoPixel library is available to work with the LED strip: | |||
<nowiki> | |||
import neopixel | |||
from machine import Pin | |||
pin = Pin(8, Pin.OUT) | |||
neo = neopixel.NeoPixel(pin, 16) | |||
# Draw a red gradient. | |||
for i in range(16): | |||
neo[i] = (i * 8, 0, 0) | |||
# Update the strip. | |||
neo.write()</nowiki> | |||
=== Buttons === | |||
2/4 buttons work, perhaps [https://github.com/micropython/micropython/issues/12479 because of this]? Please update this if you discover a solution! | |||
<nowiki>from machine import Pin | |||
sw1_pin = Pin(10, Pin.IN, Pin.PULL_UP) | |||
sw2_pin = Pin(9, Pin.IN, Pin.PULL_UP) | |||
sw1_pin.value() | |||
1 | |||
sw1_pin.value() # pressing SW1 | |||
0</nowiki> | |||
Revision as of 19:51, 20 August 2024


Firmware
<Must-still-be-uploaded>
hopebadge-0.8.14.bin
Badge Clinic
Come by the Badge Clinic, and one of our specialized nurse practitioners will help you with all of your HOPE XV Electronic Badge needs.
Come by for:
- help with assembly
- to find out more about features
- to hack on the badge
- to volunteer to help others
Description
The HOPE XV badge was given to in-person HOPE attendees. Circuit boards are purple (attendee badge) and black (pro version with more components populated). Cases are pink, green, and black (pro version).
Two 'pro' versions (with additional components) could be purchased at the Badge Clinic for $100 (extra components) and $150 (extra components and accessories).
Features
The HOPE XV Electronic Badge has lots of cool features!
- Lots of colored blinky lights (16 WS2812 or similar)!
- ESP32-C3 microcontroller
- MCP73871 LiPo LiPo battery charge controller.
- Feature 2
- Feature 3
- Feature etc
The Buttons
The firmware on the attendee Badge is setup for:
- button 1 - cycle thru light patterns
- button 2, 3 - dim/brighten LEDs
- button 4 - push to send an IR blast to other badges in Range, making their lights flash and motor vibrate
Open Hardware
The HOPE XV Electronic Badge is totally Open Hardware!
Use the vibration branch to pickup the code that runs the small vibration motor.
- The repository linked appears to be correct (REL_0.8.14), but does not specifically mention HOPE, so looking for confirmation.
It is also totally hackable.
BOM
This bill of materials is based on the KiCAD project. There are a number of components that are not populated on the badges distributed to attendees.
| Reference | Value | Datasheet | Footprint | Qty | DNP |
|---|---|---|---|---|---|
| AE1 | Antenna_Loop | ~ | Mondev:NFCAntenna_65mm_north | 1 | |
| AE2 | Antenna_Conn | ~ | Mondev:Molex_5051100492-1x04-P0.5mm_Horizontal | 1 | |
| AE4 | Antenna | ~ | Connector_Coaxial:SMA_Samtec_SMA-J-P-X-ST-EM1_EdgeMount | 1 | |
| BT1 | Battery_Cell | ~ | Connector_Molex:Molex_PicoBlade_53261-0371_1x03-1MP_P1.25mm_Horizontal | 1 | |
| C1,C2 | 18pF | ~ | Capacitor_SMD:C_0805_2012Metric | 2 | |
| C3,C31 | 10uF | ~ | Capacitor_SMD:C_0805_2012Metric | 2 | |
| C4,C6,C11,C12,C14,C15,C16,C17,C18,C19,C20,C21,C22,C23,C24,C25,C26,C27,C28,C29,C30,C35,C38,C45,C47,C50,C52,C53,C56,C58,C61,C66 | 0.1uF | ~ | Capacitor_SMD:C_0805_2012Metric | 32 | |
| C5,C7 | 15pF | ~ | Capacitor_SMD:C_0805_2012Metric | 2 | |
| C8,C9,C13,C32,C33,C46,C59,C62 | 1uF | ~ | Capacitor_SMD:C_0805_2012Metric | 8 | |
| C10,C63,C64,C65 | 0.01uF | ~ | Capacitor_SMD:C_0805_2012Metric | 4 | |
| C34,C36,C49 | 4.7uF | ~ | Capacitor_SMD:C_0805_2012Metric | 3 | |
| C37,C48,C51 | 22uF | -- mixed values -- | Capacitor_SMD:C_0805_2012Metric | 3 | |
| C39,C42 | 47pF | ~ | Capacitor_SMD:C_0805_2012Metric | 2 | |
| C40 | NC | ~ | Capacitor_SMD:C_0805_2012Metric | 1 | |
| C41,C43 | 0,1uF | ~ | Capacitor_SMD:C_0805_2012Metric | 2 | |
| C44,C57,C60 | 100pF | ~ | Capacitor_SMD:C_0805_2012Metric | 3 | |
| C54,C55,L3 | TBD | ~ | -- mixed values -- | 3 | |
| D1,D2,D3,D4,D5,D6,D7,D8,D9,D10,D11,D12,D13,D14,D15,D16 | WS2812B | https://cdn-shop.adafruit.com/datasheets/WS2812B.pdf | LED_SMD:LED_WS2812B_PLCC4_5.0x5.0mm_P3.2mm | 16 | |
| D17,D18,D20,D21,D22,D26,D27,D28 | LED | ~ | -- mixed values -- | 8 | |
| D19,D24,D25 | D_Schottky | -- mixed values -- | Diode_SMD:D_SOD-123 | 3 | |
| D23 | IR17-21C | http://www.everlight.com/file/ProductFile/IR26-21C-L110-TR8.pdf | LED_SMD:LED_1206_3216Metric | 1 | |
| FB1,FB2,FB3 | 742792042 | ~ | Inductor_SMD:L_0805_2012Metric | 3 | |
| FID1,FID2,FID3,FID4,FID5,FID6,FID7,FID8 | Fiducial | ~ | Fiducial:Fiducial_1mm_Mask2mm | 8 | |
| H1,H2,H3,H4 | MountingHole | ~ | MountingHole:MountingHole_3.2mm_M3 | 4 | |
| IC1 | IRM-H6xxT | https://datasheet.lcsc.com/szlcsc/2010221806_Everlight-Elec-IRM-H638T-TR2-DX_C390031.pdf | Mondev:IRM-H6XXT | 1 | |
| J1 | Conn_01x02 | ~ | Connector_Molex:Molex_PicoBlade_53261-0271_1x02-1MP_P1.25mm_Horizontal | 1 | |
| J2 | Conn_01x04 | ~ | Connector_JST:JST_SH_SM04B-SRSS-TB_1x04-1MP_P1.00mm_Horizontal | 1 | |
| J3,J4 | Conn_02x03 | ~ | Mondev:Badgelife-SAO-169 | 2 | |
| J5 | Conn_ARM_JTAG_SWD_10 | http://infocenter.arm.com/help/topic/com.arm.doc.ddi0314h/DDI0314H_coresight_components_trm.pdf | Connector:Tag-Connect_TC2050-IDC-NL_2x05_P1.27mm_Vertical | 1 | |
| J6 | USB_C_Receptacle_USB2.0 | https://www.usb.org/sites/default/files/documents/usb_type-c.zip | Connector_USB:USB_C_Receptacle_HRO_TYPE-C-31-M-12 | 1 | |
| J7 | Conn_01x22 | https://www.te.com/deu-de/product-2-1734839-2.html | Connector_FFC-FPC:TE_2-1734839-2_1x22-1MP_P0.5mm_Horizontal | 1 | |
| J8 | Conn_01x39 | ~ | Connector_FFC-FPC:TE_3-1734839-9_1x39-1MP_P0.5mm_Horizontal | 1 | |
| JP3 | SolderJumper | ~ | Jumper:SolderJumper-2_P1.3mm_Bridged_RoundedPad1.0x1.5mm | 1 | |
| L1 | 2nH | ~ | Inductor_SMD:L_0603_1608Metric | 1 | |
| L2 | 22uH | ~ | Inductor_SMD:L_Taiyo-Yuden_MD-4040 | 1 | |
| MK1 | SPH0641LU4H-1 | https://www.knowles.com/docs/default-source/model-downloads/sph0641lu4h-1-revb.pdf | Sensor_Audio:Knowles_LGA-5_3.5x2.65mm | 1 | |
| N1 | Housing | ~ | 1 | ||
| Q1,Q3 | DMP3056L-7 | https://www.taiwansemi.com/products/datasheet/TSM2301A_C15.pdf | Package_TO_SOT_SMD:SOT-23 | 2 | |
| Q2 | BC847 | http://www.infineon.com/dgdl/Infineon-BC847SERIES_BC848SERIES_BC849SERIES_BC850SERIES-DS-v01_01-en.pdf?fileId=db3a304314dca389011541d4630a1657 | Package_TO_SOT_SMD:SOT-23 | 1 | |
| R1,R3,R5,R7,R13,R17,R18,R26,R27,R35 | 10K | ~ | Resistor_SMD:R_0805_2012Metric | 10 | |
| R2,R21,R33 | 100 | ~ | Resistor_SMD:R_0805_2012Metric | 3 | |
| R4,R12,R14,R15 | 4K7 | ~ | Resistor_SMD:R_0805_2012Metric | 4 | |
| R6,R16,R36,R37 | 5K6 | ~ | Resistor_SMD:R_0805_2012Metric | 4 | |
| R8 | 6K8 | ~ | Resistor_SMD:R_0805_2012Metric | 1 | |
| R9 | 4.7 | ~ | Resistor_SMD:R_0805_2012Metric | 1 | |
| R10,R11 | 3K9 | ~ | Resistor_SMD:R_0805_2012Metric | 2 | |
| R19,R20 | 47 | ~ | Resistor_SMD:R_0805_2012Metric | 2 | |
| R22 | 100K | ~ | Resistor_SMD:R_0805_2012Metric | 1 | |
| R23 | 330 | ~ | Resistor_SMD:R_0805_2012Metric | 1 | |
| R24,R25 | 5K1 | ~ | Resistor_SMD:R_0805_2012Metric | 2 | |
| R28 | 2K2 | ~ | Resistor_SMD:R_0805_2012Metric | 1 | |
| R29,R32,R34 | 0 | ~ | Resistor_SMD:R_0805_2012Metric | 3 | |
| R30 | 39K2 | Resistor_SMD:R_0805_2012Metric | 1 | ||
| R31 | 2K | Resistor_SMD:R_0805_2012Metric | 1 | ||
| SF1 | Soldfeld | Mondev:SolderlittleArea_8 | 1 | ||
| SW1 | SPST-Grau | ~ | Button_Switch_SMD:SW_SPST_PTS645 | 1 | |
| SW2 | SPST-Red | ~ | Button_Switch_SMD:SW_SPST_PTS645 | 1 | |
| SW3,SW4 | SPST-Noire | ~ | Button_Switch_SMD:SW_SPST_PTS645 | 2 | |
| SW5 | SPST-Bleu | ~ | Button_Switch_SMD:SW_SPST_PTS810 | 1 | |
| SW6 | SW_SPDT | ~ | Mondev:SW_SPDT_CK-JS102011SCQN | 1 | |
| TP1,TP3,TP4,TP5,TP9,TP10,TP11,TP12,TP13,TP14,TP16,TP17,TP18,TP19,TP20,TP21,TP22,TP23,TP24,TP25 | TestPoint | ~ | -- mixed values -- | 20 | |
| TP6,TP7,TP15 | Test | ~ | -- mixed values -- | 3 | |
| U1 | ESP32-C3 | https://www.espressif.com/sites/default/files/documentation/esp32-c3_datasheet_en.pdf | Package_DFN_QFN:QFN-32-1EP_5x5mm_P0.5mm_EP3.45x3.45mm_ThermalVias | 1 | |
| U2 | AP2112K-3.3 | https://www.diodes.com/assets/Datasheets/AP2112.pdf | Package_TO_SOT_SMD:SOT-23-5 | 1 | |
| U3 | MCP73871 | http://www.mouser.com/ds/2/268/22090a-52174.pdf | Package_DFN_QFN:QFN-20-1EP_4x4mm_P0.5mm_EP2.5x2.5mm | 1 | |
| U4 | MAX17048 | https://datasheets.maximintegrated.com/en/ds/MAX17048-MAX17049.pdf | Package_DFN_QFN:DFN-8-1EP_2x2mm_P0.5mm_EP0.7x1.3mm | 1 | |
| U5 | 74LVC1G17 | https://assets.nexperia.com/documents/data-sheet/74LVC1G17.pdf | Package_TO_SOT_SMD:SOT-23-5 | 1 | |
| U6,U13,U14 | ST25DV04K-JF | https://www.st.com/resource/en/datasheet/st25dv04k.pdf | Package_DFN_QFN:DFN-8-1EP_3x2mm_P0.5mm_EP1.3x1.5mm | 3 | |
| U7 | Sensirion_SGP30 | https://sensirion.com/resource/datasheet/sgp30 | Mondev:Sensirion_SGP30 | 1 | |
| U8 | 93CxxC | http://ww1.microchip.com/downloads/en/DeviceDoc/20001749K.pdf | Package_DFN_QFN:DFN-8-1EP_3x2mm_P0.5mm_EP1.3x1.5mm | 1 | |
| U9 | PCF8574 | http://www.nxp.com/documents/data_sheet/PCF8574_PCF8574A.pdf | Package_DFN_QFN:VQFN-16-1EP_3x3mm_P0.5mm_EP1.6x1.6mm | 1 | |
| U10 | MT3608 | Package_TO_SOT_SMD:SOT-23-6 | 1 | ||
| U11 | ATECC608B | http://ww1.microchip.com/downloads/en/DeviceDoc/ATECC608A-CryptoAuthentication-Device-Summary-Data-Sheet-DS40001977B.pdf | Package_DFN_QFN:DFN-8-1EP_3x2mm_P0.5mm_EP1.3x1.5mm | 1 | |
| U12 | SKYA21024 | https://www.skyworksinc.com/-/media/skyworks/documents/products/2701-2800/skya21024_204618c.pdf | Mondev:QFN-6-1x1mm_P0.5mm | 1 | |
| Y1 | Crystal_GND24 | ~ | Crystal:Crystal_SMD_3225-4Pin_3.2x2.5mm | 1 | |
| Y2 | Crystal | ~ | Crystal:Crystal_SMD_3215-2Pin_3.2x1.5mm | 1 |
User Manual
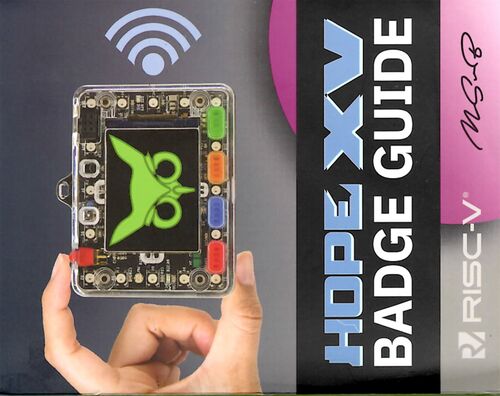
The User Manual has a lot of useful information -- you can see the PDF here:
HOPE XV Electronic Badge User Manual

Here is the User Manual for the Pro model of the HOPE XV electronic badge:
HOPE XV Pro Model User Manual

MicroPython
MicroPython firmware can be flashed on the badge to explore its features with an interactive Python console. When finished, you can copy your code to /boot.py to have it run each time it's powered on.
Installation
Note: this will erase the HOPE firmware, so please obtain a copy if you'd like to flash it back.
Using the esptool.py flasher utility:
esptool.py erase_flash
esptool.py write_flash 0x0 ~/Downloads/ESP32_GENERIC_C3-20240602-v1.23.0.bin
If no serial device is found, try holding down the SW2 button while switching on the badge to put it in "safe mode".
When finished, make note of the serial port auto-detected by esptool.py (ex. /dev/ttyACM0). You should now be able to get a Python console with:
screen /dev/ttyACM0
>>> print('hello world')
hello world
If you only see a blank screen, try pressing Enter and/or turning the badge off and back on again.
Snippets
Please see the Quick reference for the ESP32 for helpful snippets.
WiFi
WiFi works (please see this guide), with one caveat: maybe my badge is faulty, but I had to reduce the transmit power level slightly to connect to an access point:
import network

wlan = network.WLAN(network.STA_IF)
wlan.active(True)

wlan.config(txpower = 14) # HACK: see note above

wlan.connect('my-ssid', 'my-key')
wlan.isconnected() # wait until True
wlan.ifconfig()
LEDs
A NeoPixel library is available to work with the LED strip:
import neopixel
from machine import Pin

pin = Pin(8, Pin.OUT)
neo = neopixel.NeoPixel(pin, 16)

# Draw a red gradient.
for i in range(16):
    neo[i] = (i * 8, 0, 0)

# Update the strip.
neo.write()
Buttons
2/4 buttons work, perhaps because of this? Please update this if you discover a solution!
from machine import Pin

sw1_pin = Pin(10, Pin.IN, Pin.PULL_UP)
sw2_pin = Pin(9, Pin.IN, Pin.PULL_UP)

sw1_pin.value()
1
sw1_pin.value() # pressing SW1
0
