Build an Easy Ventilator workshop: Difference between revisions
m →Parts: |
|||
| Line 55: | Line 55: | ||
==Parts:== | ==Parts:== | ||
{| class="wikitable" | {| class="wikitable" | ||
|- | |- | ||
Revision as of 07:59, 30 July 2020
Abstract:

As COVID19 sweeps the world, thousands of people die of pneumonia everyday. One of the key lifesavers is the ventilator, but due to this insane number of cases, ventilators are on short supply. We designed this workshop to help people create simple, inexpensive and portable ventilators to fight the pandemic, as well as to let participants learn coding and engineering.
This workshop is for total newbies although having some programming and/or engineering experience will benifit you drastically. Besides learning new skills, you’ll have fun and do you part in fighting the pandemic!
Both the code and the hardware are provided by us, however if you would like to tinker around, please do so!
Time:
TBD
Disclaimer: This ventilator, while we believe is helpful, has not been clinically tested or approved by any medical adminstrations. If there are professional ventilators avaliable, please use those. We are not responsible for any injuries or deaths caused by this piece of equipment.
Full Description:
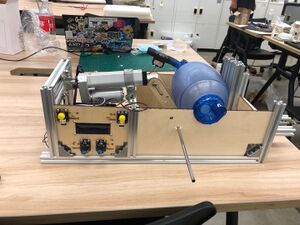
Participants will learn the basic functions of a ventilator and how to achieve those functions in the easiest way possible. They will learn how to build a simple frame and mechanism for the ventilator, as well as how to compile and possibly edit the code.
Though simple, inexpensive, and portable, the ventilator we have created for this workshop has 3 modes: Manual, timed, or dynamic. Manual is the easiest to use and program, as its basically just actuating a motor when you press a button. Timed is slightly harder, as it requires the motor to be actuated, then wait a certain time, then repeat. Dynamic is the hardest, as you have to test the air pressure in the respiration tube, and wait until it is negative. This shows that the patient is attempting to breathe, and the motor must actuate to assist with it.
We will provide the code in a link, however, if you would like to use your own code, that is totally up to you!
This workshop is taught by Kevin Zheng and Rockets Xia
Summary:
What: Make a basic ventilator
When: TBD
Where: Link will be emailed to participants
Who: Anyone!
Max #: 10 participants
--You must register to participate in this workshop--
Cost: 150$ for the parts
Parts:
| No | Name | Size | Quantity | Remarks |
|---|---|---|---|---|
| 1 | 2020Aluminum profile | 500mm | 4 | |
| 2 | 2020Aluminum profile | 160mm | 9 | |
| 3 | 2020Aluminum profile | 120mm | 2 | |
| 4 | 2040Aluminum profile | 160mm | 2 | |
| 5 | 2020Aluminum profile triangle connector | 18 | ||
| 6 | 12Velectric putter | range:80mm,speed:90MM/min,force:100N/M | 1 | |
| 7 | Analog Rotation Potentiometer Sensor | 2 | https://www.dfrobot.com/product-87.html | |
| 8 | Digital Push Button | 2 | https://www.dfrobot.com/product-73.html | |
| 9 | I2C 16x2 Arduino LCD Display Module | 1 | https://www.dfrobot.com/product-135.html | |
| 10 | Romeo - an Arduino Robot Control Board with Motor Driver | 1 | https://www.dfrobot.com/product-656.html | |
| 11 | M3 copper stud | 30mm | 8 | |
| 12 | M3x8 screw | 8mm | 30 | |
| 13 | M3 nut | 30 | ||
| 14 | M3x12 screw | 12mm | 4 | |
| 15 | M5x50 screw | 50mm | 1 | |
| 16 | M5 Locknut | 1 | ||
| 17 | M5x20screw | 20mm | 2 | |
| 18 | M5 Profile nut | 2 | ||
| 19 | rod | ø6x260 | 1 | |
| 20 | 5MM wood board | 4 | check the upload files | |
| 21 | 12V power adapter | 5a | 1 | |
| 22 | Ventilator airbag | 1 |
Required software:
